Automating Intelligence: How to Build an AI-Powered Slack Bot with n8n | Filter B
Engineering Journal28 June 2026
Automating Intelligence: How to Build an AI-Powered Slack Bot with n8n
FB
Bhuvan
Technical Staff
11Total Views
8mRead Time
Architectural Overview
Before diving into the configuration details, it is helpful to look at how data moves through the ecosystem. When a user mentions your bot in Slack, it triggers an event-driven chain reaction that processes the message using advanced AI logic and routes the response back instantly.
graph TD
%% Summer Theme Setup: Blue, Gold, and Coffee
%%{init: {'theme': 'base', 'themeVariables': {
'primaryColor': '#fefae0',
'primaryTextColor': '#4a3b32',
'lineColor': '#8b5a2b'
}}}%%
classDef slack fill:#ffb703,stroke:#fb8500,stroke-width:2px,color:#4a3b32;
classDef n8n fill:#8ecae6,stroke:#219ebc,stroke-width:2px,color:#023047;
A[Slack Workspace]:::slack -- 1. App Mention Event --> B(n8n Webhook Listener):::n8n
B -- 2. Parse Message Text --> C(n8n AI Agent Node):::n8n
C -- 3. Generate Solution Response --> D(n8n Slack Output Node):::n8n
D -- 4. Post Message Payload --> A:::slack
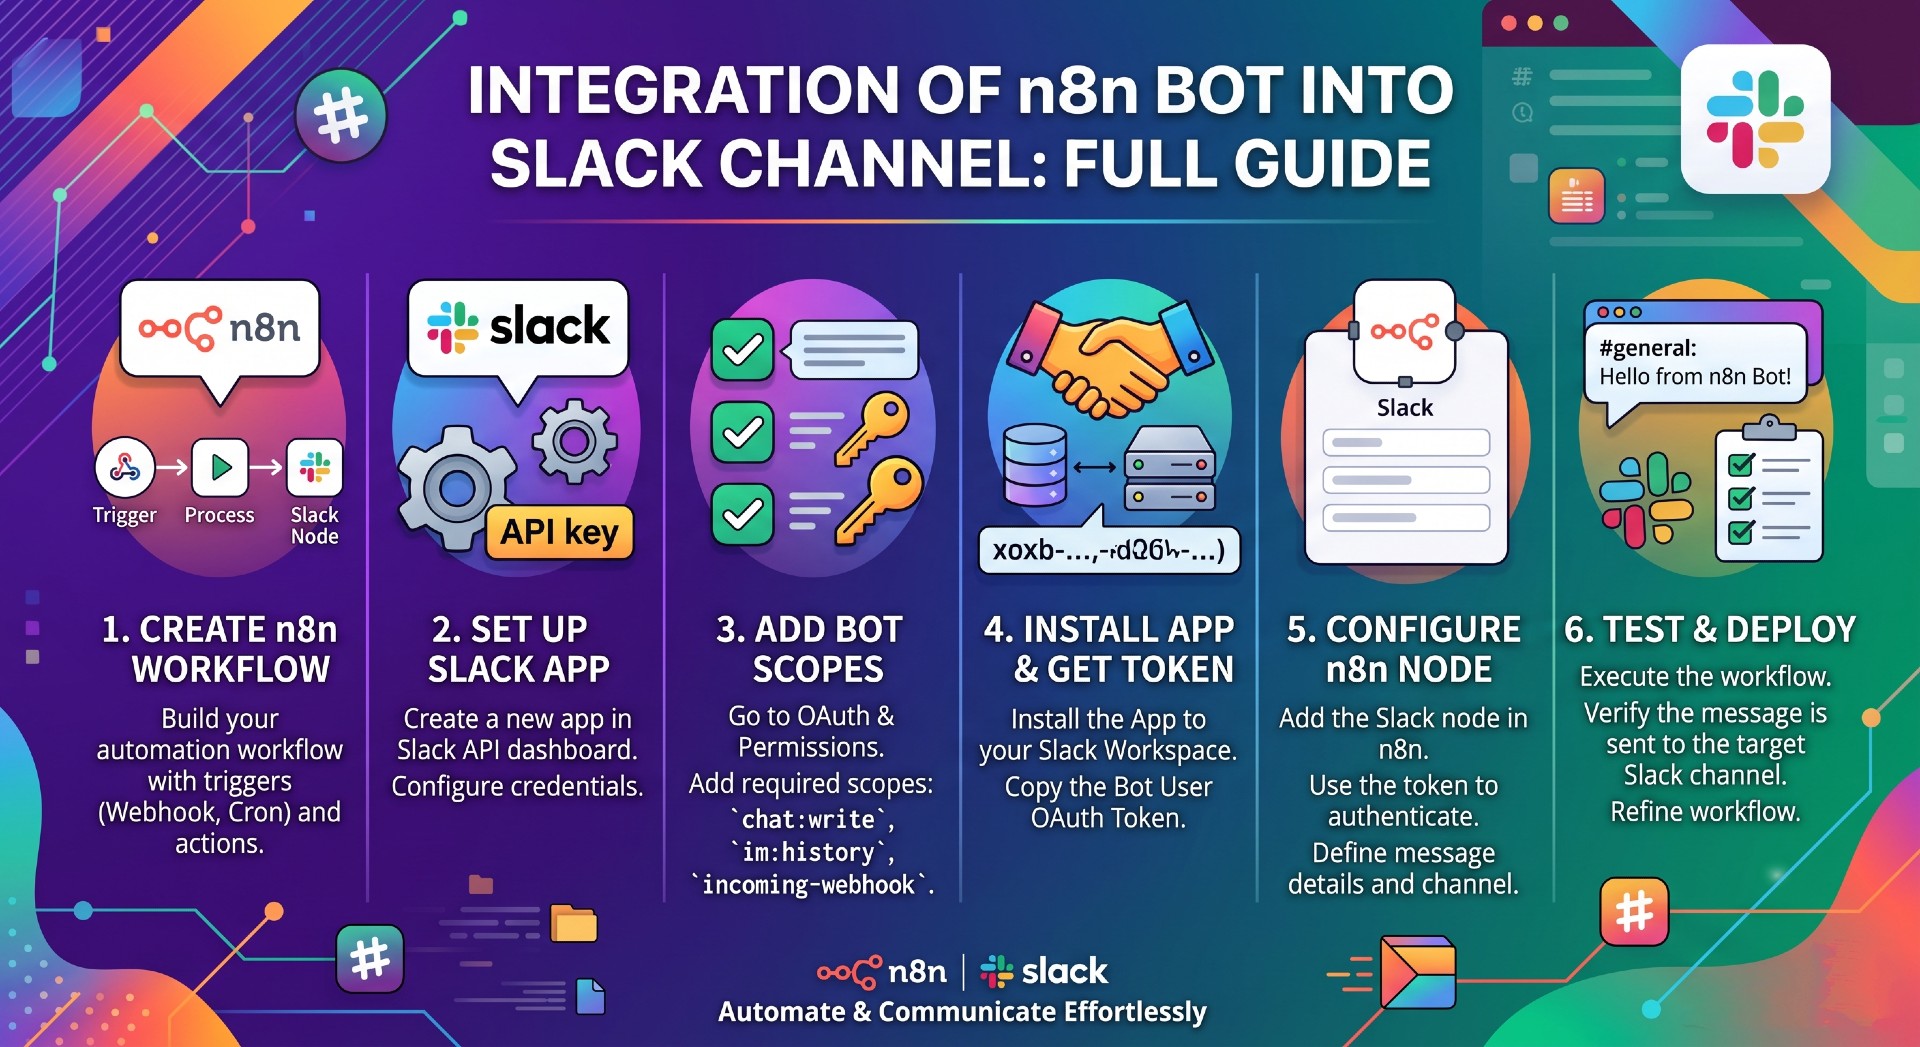
Detailed Step-by-Step Implementation
Phase 1: Creating and Configuring the Slack App
To get started, you need to create the bot application within your Slack workspace and assign the precise granular permissions required to interact with your text channels.
graph TD
%% Summer Theme Setup: Blue, Gold, and Coffee
%%{init: {'theme': 'base', 'themeVariables': {
'primaryColor': '#fefae0',
'primaryTextColor': '#4a3b32',
'lineColor': '#8b5a2b'
}}}%%
classDef slack fill:#ffb703,stroke:#fb8500,stroke-width:2px,color:#4a3b32;
A[Admin Tools > Apps & Workflows]:::slack --> B[Build > Create New App]:::slack
B --> C[Select: From Scratch]:::slack
C --> D[Configure OAuth & Permissions]:::slack
D --> E[Add Bot Token Scopes]:::slack
E --> F[Install App to Workspace]:::slack
F --> G[Extract Bot User OAuth Token]:::slack
Navigate to App Settings: Log into your Slack workspace via a web browser. Click on Admin Tools in your workspace menu and navigate to Apps & Workflows.
Build the App: In the Installed Apps administration dashboard, look to the top right corner and click Build. Select Create New App, choose From Scratch, and provide a recognizable name for your bot.
Configure Permissions: Once your new application dashboard loads, navigate to the left sidebar menu, scroll to the Features section, and click on OAuth & Permissions.
Assign Scopes: Scroll down to the Scopes sub-section. Under Bot Token Scopes, individually add the following 6 essential authorization scopes:
app_mentions:read — Allows the app to see messages where it is explicitly mentioned.
channels:history — Allows the app to view messages in public channels it belongs to.
channels:read — Allows the app to view basic information about public channels.
chat:write — Gives the app permission to post messages to channels.
im:history — Allows the app to view messages in direct messages.
users:read — Allows the app to view profile details of users in the workspace.
Generate the Token: Scroll back up to the OAuth Tokens for Your Workspace section and click the Install to Workspace button. Review the requested access permissions and click Allow. Copy the generated string starting with xoxb-; this is your Bot User OAuth Token.
Phase 2: Setting up the n8n Listener
With your Slack application configured, you must prepare n8n to ingest data from your workspace using a dedicated event trigger.
graph TD
%% Summer Theme Setup: Blue, Gold, and Coffee
%%{init: {'theme': 'base', 'themeVariables': {
'primaryColor': '#fefae0',
'primaryTextColor': '#4a3b32',
'lineColor': '#8b5a2b'
}}}%%
classDef n8n fill:#8ecae6,stroke:#219ebc,stroke-width:2px,color:#023047;
classDef slack fill:#ffb703,stroke:#fb8500,stroke-width:2px,color:#4a3b32;
A[Add Slack Trigger Node]:::n8n --> B[Create New Credentials]:::n8n
B --> C[Paste xoxb Token into Access Token Field]:::n8n
C --> D[Set Event to Bot/App Mention]:::n8n
D --> E[Extract Target Slack Channel ID]:::slack
E --> F[Set Channel to Watch via ID]:::n8n
F --> G[Invite Bot using /invite command]:::slack
Create the Trigger: Open your n8n instance and create a blank workflow. Click Add First Step and search for the Slack Trigger node. Select it to place it on your canvas.
Authenticate: Inside the node configuration panel, click the credentials dropdown menu and select Create New Credential. Take your copied xoxb-Bot User OAuth Token and paste it directly into the Access Token field. Save the credential connection.
Target a Channel: Set the node event filter to trigger specifically on a Bot/App Mention. To lock this node down to an individual operational room, go back to your Slack client, right-click your target channel, select View Channel Details, navigate to the About tab at the bottom, and copy the alphanumeric Channel ID. Return to n8n, switch the channel selector mode from Name to ID, and paste the value.
Invite the Bot: To ensure your application has visibility into that room, open the target channel in Slack and type the command /invite @<your_bot_name>. Confirm the addition when prompted.
Phase 3: The Webhook Handshake
Webhooks operate as instant notification systems. To establish real-time processing, you must tell Slack precisely where to send data packets the absolute second a user mentions your bot.
graph TD
%% Summer Theme Setup: Blue, Gold, and Coffee
%%{init: {'theme': 'base', 'themeVariables': {
'primaryColor': '#fefae0',
'primaryTextColor': '#4a3b32',
'lineColor': '#8b5a2b'
}}}%%
classDef n8n fill:#8ecae6,stroke:#219ebc,stroke-width:2px,color:#023047;
classDef webhook fill:#f4a261,stroke:#e76f51,stroke-width:2px,color:#4a3b32;
classDef slack fill:#ffb703,stroke:#fb8500,stroke-width:2px,color:#4a3b32;
A[n8n: Copy Test Webhook URL]:::n8n --> B[n8n: Click 'Execute Step' Listener]:::webhook
B --> C[Slack: Enable Event Subscriptions]:::slack
C --> D[Slack: Paste Webhook and Verify Connection]:::webhook
D --> E[Slack: Subscribe to app_mention Bot Event]:::slack
Get the n8n URL: Inside your n8n Slack Trigger node properties window, look at the top section labeled Webhook URLs. Switch the toggle to Test, and copy the generated Webhook URL to your clipboard. Click the pulsing Execute Step button at the bottom of the node; this forces n8n into an active "listening" state to await validation payloads.
Paste in Slack: Open your Slack App Dashboard and select Event Subscriptions from the left-hand navigation bar. Toggle the Enable Events switch to On. Paste your copied n8n Test Webhook URL into the Request URL text box. Slack will instantly send a trial JSON challenge payload to n8n to verify ownership, and a green "Verified" message will appear above the box.
Subscribe to the Event: Scroll down the Event Subscriptions page to the Subscribe to bot events section. Click Add Bot User Event, choose app_mention from the auto-suggest list, and click Save Changes at the bottom right corner of the dashboard page.
Phase 4: Building the AI Intelligence & Output Loop
With infrastructure endpoints securely tied together, you can now construct your downstream data-processing logic by passing incoming text directly through an automated artificial intelligence brain.
graph TD
%% Summer Theme Setup: Blue, Gold, and Coffee
%%{init: {'theme': 'base', 'themeVariables': {
'primaryColor': '#fefae0',
'primaryTextColor': '#4a3b32',
'lineColor': '#8b5a2b'
}}}%%
classDef n8n fill:#8ecae6,stroke:#219ebc,stroke-width:2px,color:#023047;
classDef ai fill:#b7e4c7,stroke:#74c69d,stroke-width:2px,color:#1b4332;
A[Connect Slack Trigger Output]:::n8n --> B[Add AI Agent Node]:::ai
B --> C[Set Prompt Source to Define Manually]:::n8n
C --> D[Drag-and-Drop Slack Text Field into Prompt Box]:::n8n
D --> E[Add Slack - Send Message Node]:::n8n
E --> F[Toggle Text Input to Expression Mode]:::n8n
F --> G[Drag-and-Drop AI Text Output to Message Box]:::n8n
Add the AI Agent: Connect the output port of your Slack Trigger node to a new AI Agent node. To pull in the exact message text from Slack, open the AI Agent configuration panel, locate the Prompt configuration field, and change the input source setting from "Connect Chat Trigger" to Define Manually.
Map the Prompt Input: Look at the left hand panel showing the schema output from your previous Slack step. Drill down through the json body properties (body -> event -> text). Click and drag the text node field directly into your manual prompt entry box. n8n will automatically format this into an expression string like {{ $json.body.event.text }}.
Return the Output: Create a final action block by appending a standard Slack node to the end of your AI Agent. Set the node operation parameter to Send Message. Paste your target Channel ID directly into the channel identifier box.
Map the Response: Move down to the Text parameter block of your Slack send node. Click the small expression icon (indicated by a gear or an expression text link) to switch the input field from static text to live execution data. Drag the calculated text output variable from your AI Agent node directly into this terminal box.
Once your nodes are neatly chained, toggle the workflow from Deactivated to Active in the top menu bar. Your infrastructure loop is complete! Your bot will now sleep until mentioned, wake instantly upon receiving a notification, parse information using your AI models, and deliver solutions cleanly back into Slack.